Did you know that roughly 95% of your website visitors will leave without taking a single action (such as giving you their email address or buying one of your awesome products or services)?
What if you could capture some of that traffic and then remind them about all the awesomeness you have to offer back on your website?
Well, you can. Say hello to the Facebook Pixel.
What’s the Facebook Pixel?
It’s a piece of code that sits on your website and captures the details of the visitors and stores the information in your Facebook Ad account. You can then create ads and show them to those people. Freaky, I know!
You’ve probably already seen lots of these ‘retargeting’ ads in Facebook. It’s when you’ve been browsing a website and then you come back into Facebook and it seems like you’re being stalked. Because exactly what you were looking at shows up as an ad in your newsfeed!
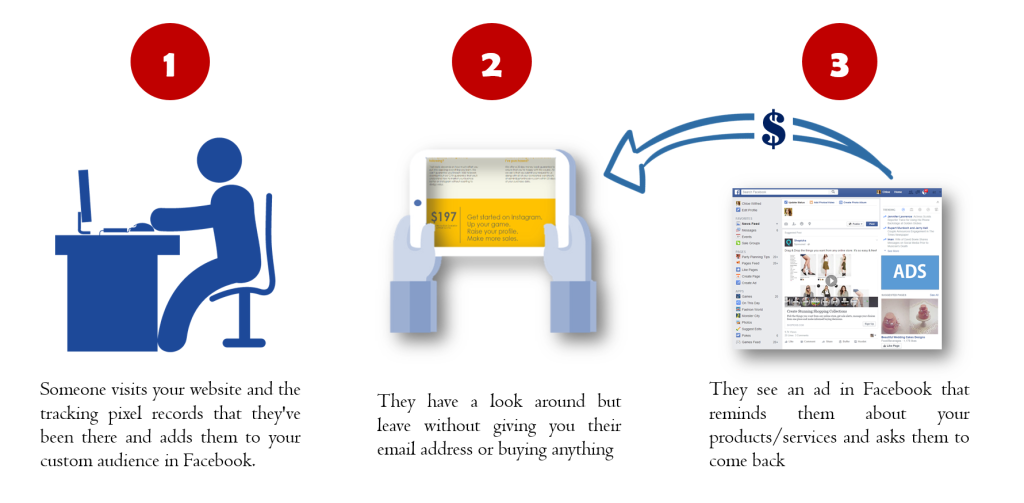
The theory goes that if you’ve already been to a website then there’s a much higher probability of you clicking on an ad and then buying because you already recognise the brand.
Soooooo, if you have a website and you think that there’s the slightest chance that you might run Facebook ads at some point in the future, then you need to get a Facebook tracking pixel added to your website ASAP!
Check out the video tutorial for where to find it in Facebook, and instructions how to add it to your website:
So I’m in my home feed in Facebook, and I’m just gonna click the Facebook Ads Manager on the left hand side here to go to the Ads Manager. There’s Tools on the top; just click on that and choose Events Manager. This takes me into the screen where I can create my Facebook Pixel.
If it’s the first time you’ve done this you’ll see this screen:
So thats one pixel that I get for my ad account which is the tracking pixel. And that is the pixel that you want to add to your website, to your landing pages and to track all the people that come there. They’re different from the conversion tracking pixel. (I’ll do another video on conversion tracking pixels in a future blog post.)
So this code here is what you want to add to your website and your landing page. If you just click once in the box, it will select all the code. And then you just copy that over to the correct place on your website or Leadpages.
In the Dotti Media website the theme we’re using is the Genesis theme. So its really very easy to add the pixel there. When I’m at the backend of my website I just click on Genesis on the left hand side. And then I just scroll down to Header and Footer Scripts.
And then I just paste my pixel code into the ‘Header Scripts’ box.
Now if you don’t have Genesis theme you may need a developer to do it. Alternatively, you can use a plugin called Insert Headers and Footers by WPBeginner. To add it to your WordPress website go to Plugins and click Add New. And search for Insert Headers and Footers. And then you just install and activate it. Then click Settings, then Headers and Footers and then place your code in Scripts in Header.
Squarespace & WIX Websites
If you have a Squarespace website, here’s an article that tells you where to put it.
For WIX, simply follow these instructions.
For WIX, simply follow these instructions.
Now you can start building your Website Custom Audience in Facebook!